
The Auto Tool Measurement application is designed to automatically measure the tool length on a milling machine under linuxcnc (ver.2.6 and higher). The purpose of the method: to automate all actions when manually changing the tool to the maximum so that all you have to do is just take out the old cutter insert the new cutter. The article provides a description and sources.
Note: The updated application Probe Screen V2 now includes Auto Tool Measurement (Remap M6). The development of the project will now take place inside the Probe Screen.
Features:
- method is based on remap M6, when g-code "M6 Tx" is detected in the text (or with MDI command M6 Tx) a dialog for manual tool change is performed and then a measurement is performed automatically followed by recording the indent for Z into the tool table and automatic execution of g-code,
- “once-and-forever” type settings are made in the .ini file (shift position, sensor tool setter position, maximum search distance Probe),
- settings "on the fly" are made in the "Settings" window (surface of the workpiece, the speed of search and refinement).
Requirement: two sensors - Touch probe and Tool setter.
Installation
...more (horizontal scrolling works)
1. Add the following settings to .ini file
......
[DISPLAY]
#Interface used
DISPLAY = axis
# add GladeVCP panel as a tab next to the Preview / DRO:
EMBED_TAB_NAME=Auto Tool Measurement
EMBED_TAB_COMMAND=halcmd loadusr -Wn gladevcp gladevcp -c gladevcp -u python/auto_tool_measurement.py -x {XID} auto_tool_measurement.glade
......
[RS274NGC]
# Ability to read INI and HAL variables from gcode, etc.
FEATURES=30
# Folder for subroutines
SUBROUTINE_PATH = macros
# The subroutine is called upon failure during execution of remap M6 procedures
ON_ABORT_COMMAND=O <on_abort> call
# Remap M6
REMAP=M6 modalgroup=6 prolog=change_prolog ngc=manual_change epilog=change_epilog
......
[TOOLSENSOR]
# Position X (abs), Y (abs) for Tool setter, position Z (abs) from which the search starts
X = 10
Y = 10
Z = 20
# Search distance in relative coordinates, should be negative (search down).
MAXPROBE = -20
...
[CHANGE_POSITION]
# Position tool change. All in absolute coordinates
X = 10
Y = 10
Z = 60
...
[PYTHON]
#Folder for custom modules
PATH_PREPEND = ./python
# Launch point remap procedures
TOPLEVEL = python/toplevel.py
P.S. If you need to add another application, for example Probe Screen, then you need to connect it without a component "-c gladevcp ", that
EMBED_TAB_NAME=Probe Screen
EMBED_TAB_COMMAND=gladevcp -u python/probe_screen.py -x {XID} probe_icons/probe_screen.glade
2. The following files from the archive put in:
your-config-folder/python:
auto_tool_measurement.py
remap.py
stdglue.py
toplevel.py
your-config-folder/macros:
manual_change.ngc
on_abort.ngc
probe_down.ngc
block_down.ngc
your-config-folder:
auto_tool_measurement.glade
sketch_auto_tool_measurement.png
3. Supplement the line for the probe into the .hal file if not exist, (approximately like this):
net probe motion.probe-input <= parport.0.pin-15-in
4. delete (or comment out) from all .hal files lines like:
loadusr -W hal_manualtoolchange
net tool-change iocontrol.0.tool-change => hal_manualtoolchange.change
net tool-changed iocontrol.0.tool-changed <= hal_manualtoolchange.changed
net tool-number iocontrol.0.tool-prep-number => hal_manualtoolchange.number
net tool-prepare-loopback iocontrol.0.tool-prepare => iocontrol.0.tool-prepared
5. add custom-postgui.hal with lines:
# The next two lines are only needed if the pins had been connected before
unlinkp iocontrol.0.tool-change
unlinkp iocontrol.0.tool-changed
# link to auto_tool_measurement toolchange, so you get the advantage of tool description on change dialog
net tool-change auto_tool_measurement.toolchange-change <= iocontrol.0.tool-change
net tool-changed auto_tool_measurement.toolchange-changed <= iocontrol.0.tool-changed
net tool-prep-number auto_tool_measurement.toolchange-number <= iocontrol.0.tool-prep-number
net tool-prep-loop iocontrol.0.tool-prepare <= iocontrol.0.tool-prepared
Using.
1. Run linuxcnc.
2. Set Home.
3. Install the workpiece.
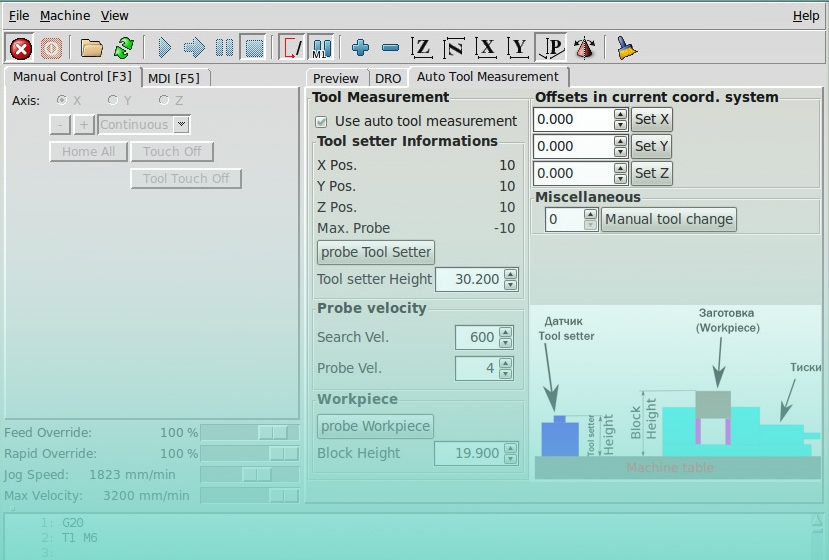
4. Install the Probe in the spindle.
5. Fill in the desired search and refinement speeds and make the Tool setter height measurement (click on this button, the subroutine knows where to go from the settings made in .ini, I recommend [TOOLSENSOR] Z and [CHANGE_POSITION] Z to start with the maximum top position that do not catch anyone)

The measurement result will appear in the Tool Setter Height field.
6. Go to the surface of the workpiece (manually, stop 3-4 mm from the surface) and press this button
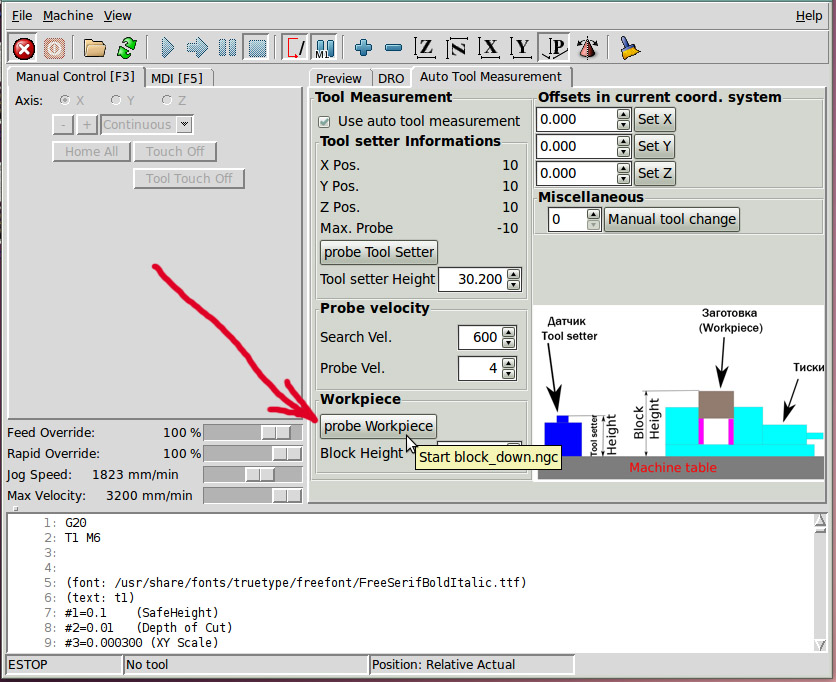
The measurement result will appear in the Block Height field. The surface of the workpiece in g-code with this Block Height will lie on Z = 0, so that it may be different, add the any value to the measured value (get the surface below zero) or subtract (get the surface above zero) and manually enter the result in the Block Height field, confirming Enter.
7. Set offsets for workpiece zeros X and Y. For example,
- either supply the our Probe to the assumed zeros by XY manually and enter 0 in the offsets field and confirm with the "set X" and "set Y" buttons,
-or, for more accurate exposure, go to the tab Probe Screen and appropriately display the position to 0. (Also make sure that XY (g92) = 0, XY (tlo) = 0).
That's all. From this place you can run the g-code program. When M6 Tx encounters, linuxcnc will move to the tool change point, show a message to change to such a tool (even the comment from the table for this tool will show: good :), change tool, press Ok, then the new tool is measured and continue the program.
If there is an obstacle on the way to the point of change (vice, etc.), you need to “complicate” the path to the place of tool change in the file manual_change.ngc, namely add after 21 and 61 lines. point in the route:
G53 G0 X? Y?
The tool change in your g-code program being developed this way
M6 Tx
G43 Hx
Important! In the tool table it is necessary that all X and Y indents for all tools used in Auto Tool Measurement are = 0.
Important! It is recommended to insert a tool change at the beginning of the g-code program, even if it is the same.